Online resource of Entrepreneurship, Technology, Gadgets and Blogging
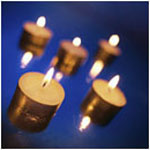
How To Make Scented Candles
Manny,
Candle making is not new and also scented candle was already in the market for so long. Since candle business is seasonal, for example here in the Philippines there is a large demand during All Saints Day and I think scented candle also have a peak season during holidays or maybe Valentine’s Day for a romantic dinner or whatever gig you might have in mind. Anyway scented candle can also be a good business whole year round since just buying a candle to light in your home don’t need to have an occasion to do it. It will depend entirely on the customer if he or she likes to make his ambiance full of aroma of those scented candles.
So if you wanted to go into this business, it is advisable to attend seminars and trainings because you will not only learn how to make those candles, you will also learn other things like tips and tricks, how to maximize your investments or other opportunities. But you can also start by your own by searching for instructions or “how-to-make” on the internet like the one I have for you (see below with pictures). If you are interested to make or start one, or just wanted to see if you can do the steps, then proceed reading the steps below:
How to Make a Scented Candle
Ingredients you will need:
Parafin wax
Hard wax
Dye (oil based)
Essential oil
Primed wick (“mitsa” in tagalog)
Molds ( for molding the candles )
Melting pot
Wooden or bamboo sticks (for mixing)
Procedure: 1. Measure the wax by weighing in scale. For starter, you can use 900 grams of paraffin wax and 100 grams hard wax to make it 1 kilogram. The ratio should be 90% paraffin wax and 10% hard wax. It will be hard to calculate if you use 1 kilo of paraffin wax so better start with 900 grams first. If you purchase 1 kilo of paraffin wax, you can set is aside for your next candle making process.
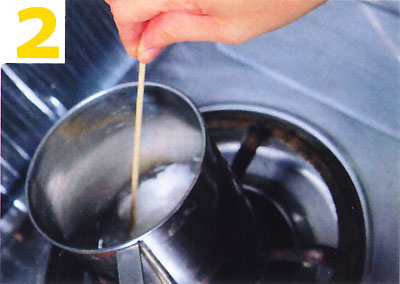
2. Melt the wax in a melting pot shown in the picture below. Use the bamboo or wooden stick to mix the wax until it melts and blend thoroughly. You can also use disposable chopsticks if you have one.
3. Set aside the melted wax for the next step.
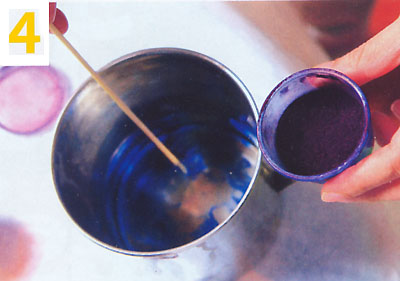
4. Add a few drops of dye until the desired color is achieved. You can do that by experimentation. Also add a few drops of essential oil then mix thoroughly.
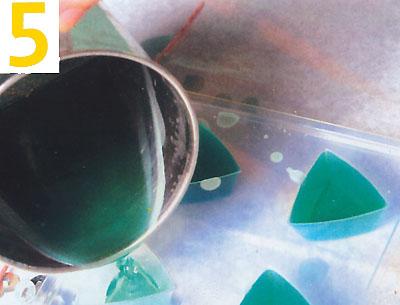
5. Prepare the mold first by placing the wick on each slot. You can use plastic or stainless steel molds. Then you can pour the candle mixture on molds until every slot is filled. You can also put the mold on water to hasten the hardening process and to make a smoother finish. If you want to make a rustic finish, melted wax should be cooler before pouring it to the mold. Also, make sure that the you choose wick is not too large to avoid excessive melting of the candles when it is lighted.
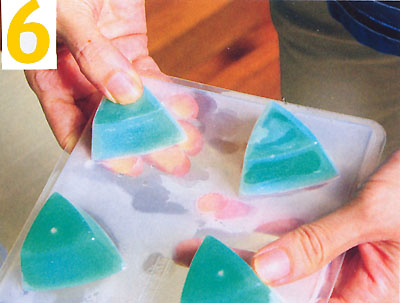
6. Remove the candles from the mold after it becomes solid. You can decorate it with ribbons or other added designs you can think of using using indigenous materials.
Hello! I’am a candle maker and a seller of Raw Materials. Please send me email at [email protected] if you have questions or if you want to buy candle materials.Thank You 🙂
Saka pwede po bang paki email din ako ng mga correct measurement sa candle making? maraming maraming salamat po!!!! 🙂
Hi! San po! San po exactly sa divisoria ang bilihan ng candle raw materials? Talagang di ko alam ang bilihan… Napakalaking tulong po! Salamat ng marami!!!
i would like to make living with it,..huhu sana carry ko gumawa ng candles.. 🙂
And can you specify the cost? Thanks… 😀
♥ Thea
I’m fifteen years old, living in Muntinlupa city (Ayala Alabang). I’m making an investigatory project for chemistry that includes making scented candles.
Where can I go so I can buy the materials? (Hard wax, paraffin wax, essential oil, and the wicks.) Are these available in SM, Robinsons, Glorietta…? I know you already said Divisoria, but on the chance that I won’t be allowed to go there, where else can I find these materials? (Please name places NEAR MUNTINLUPA).
If I don’t want to add the dye, will it change the composition of the candles?
Do these candles actually work? Or are they just meant for display?
Please answer.
ei, where can i buy those things needed in making candels..
thanks po for the response…
pls. badly need it po. i want to start making personalized candles po kasi..
thanks po!! godbless u~
hi.. ive read all ur posts and it is very useful.. nakakainspire po na merong taong katulad mo na nag sshare ng mga ideas sa business..
thanks a lot po!
by the way, ask ko lng po if may alam po kayong pwedeng bilhan ng mga raw materials for candles? thanks!
@ivy rabago
Usually sa Divisoria talaga ang bilihan ng mga raw materials pero meron ding mga resellers sa ibang places ng Metro Manila. Try ko ring hanapin yung mga nag-comment dito sa blog na mga sellers ng raw materials ng candles.
Sir, Plan ko maka attend ng seminar for Candle making, san ba pwede?
thank i know now what to do in my investigatory project.
I’ve been looking for an opportunity for quite sometime, a little hesitation on putting up my own business for alot of reasons and I guess that hinders my desire of doing it. My wife and I were thinking of going to candle business but don’t know where to start can you give us some thoughts.
@Eric Retorta
“While some people are studying the roots,others are picking the fruit.†– Jim Rohn
There is no perfect time to start but now. Siguro a training of candle making is good start. But if you believe on feng shui, bawat tao ay may lucky element which is connected to the kind of career or business you should go in. For example, if your lucky element is fire, then those things connected to fire like the candle making, is one of your choice.
Boss Eric san po pwede mag training
where can i buy the raw materials needed. thank u
hi! I am interested to learn and make candles. can u give me the procedure in how to make scented candles.
thank u
 Candle making is not new and also scented candle was already in the market for so long. Since candle business is seasonal, for example here in the Philippines there is a large demand during All Saints Day and I think scented candle also have a peak season during holidays or maybe Valentine’s Day for a romantic dinner or whatever gig you might have in mind. Anyway scented candle can also be a good business whole year round since just buying a candle to light in your home don’t need to have an occasion to do it. It will depend entirely on the customer if he or she likes to make his ambiance full of aroma of those scented candles.
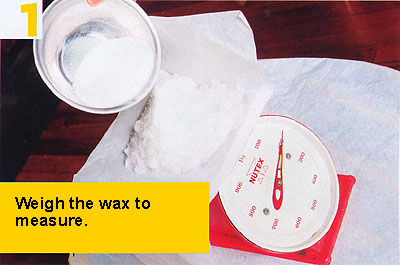


Hello! I’am a candle maker and a seller of Raw Materials. Please send me email at [email protected] if you have questions or if you want to buy candle materials.Thank You 🙂
Saka pwede po bang paki email din ako ng mga correct measurement sa candle making? maraming maraming salamat po!!!! 🙂
Hi! San po! San po exactly sa divisoria ang bilihan ng candle raw materials? Talagang di ko alam ang bilihan… Napakalaking tulong po! Salamat ng marami!!!
i would like to make living with it,..huhu sana carry ko gumawa ng candles.. 🙂
And can you specify the cost? Thanks… 😀
♥ Thea
I’m fifteen years old, living in Muntinlupa city (Ayala Alabang). I’m making an investigatory project for chemistry that includes making scented candles.
Where can I go so I can buy the materials? (Hard wax, paraffin wax, essential oil, and the wicks.) Are these available in SM, Robinsons, Glorietta…? I know you already said Divisoria, but on the chance that I won’t be allowed to go there, where else can I find these materials? (Please name places NEAR MUNTINLUPA).
If I don’t want to add the dye, will it change the composition of the candles?
Do these candles actually work? Or are they just meant for display?
Please answer.
ei, where can i buy those things needed in making candels..
thanks po for the response…
pls. badly need it po. i want to start making personalized candles po kasi..
thanks po!! godbless u~
hi.. ive read all ur posts and it is very useful.. nakakainspire po na merong taong katulad mo na nag sshare ng mga ideas sa business..
thanks a lot po!
by the way, ask ko lng po if may alam po kayong pwedeng bilhan ng mga raw materials for candles? thanks!
@ivy rabago
Usually sa Divisoria talaga ang bilihan ng mga raw materials pero meron ding mga resellers sa ibang places ng Metro Manila. Try ko ring hanapin yung mga nag-comment dito sa blog na mga sellers ng raw materials ng candles.
Sir, Plan ko maka attend ng seminar for Candle making, san ba pwede?
thank i know now what to do in my investigatory project.
I’ve been looking for an opportunity for quite sometime, a little hesitation on putting up my own business for alot of reasons and I guess that hinders my desire of doing it. My wife and I were thinking of going to candle business but don’t know where to start can you give us some thoughts.
@Eric Retorta
“While some people are studying the roots,others are picking the fruit.†– Jim Rohn
There is no perfect time to start but now. Siguro a training of candle making is good start. But if you believe on feng shui, bawat tao ay may lucky element which is connected to the kind of career or business you should go in. For example, if your lucky element is fire, then those things connected to fire like the candle making, is one of your choice.
Boss Eric san po pwede mag training
where can i buy the raw materials needed. thank u
hi! I am interested to learn and make candles. can u give me the procedure in how to make scented candles.
thank u